Pages

Saturday, October 29, 2011

Eragon Cake


What kind of cake do you make for a sweet boy who is a true bookworm and loves dragons?  Why, an Eragon cake of course!  This is one of my favorite cakes I have made so far.  I know I keep saying this, but I loved making this cake!   I took great pleasure in sculpting Saphira (the dragon) out of cereal treats, covering her in fondant, and giving her dragon scales and spikes and a little personality!  Her wings are painted with a blue sheen food colour, which gave them a bit of a sparkle.
The dragon in the movie and the dragon in the book by Christopher Paolini differ somewhat...so I tried to incorporate features of both.

The book, of course, is the actually cake (2 layer chocolate cake, with raspberry buttercream filling, covered in chocolate ganache and then fondant).   A ribbon (fondant) bookmark with birthday well-wishes written on it marks a pretend place within the "book".


Friday, October 28, 2011

Built like a Mack Truck


A structurally challenging cake made for my friends who own Mack Trucks in Nanaimo - for their 10th Anniversary "Bull Dog Days" celebration.   I had a great time making this and it was the first time I had to built a wooden support structure to hold and raise my cake!

The length of the trailer and cab combined was 22" long.  Height, including support dowels/axles was approx. 8".  It took 5 large cakes to make and weighed 21.5 lbs!

I've included some photos of the cake as it went along...


Cake base structure
Cab assembled and ganached...

Cab and trailer ganached and awaiting fondant!

Tires are cookies, covered in black fondant. Hand painted silver "hub caps".  See the little "chrome" bull dog mounted on the hood!?  :-)


Sunday, October 23, 2011

Happy Quilter!


My mom requested a cake for her friend who was turning 65, that loves quilting.  It's hard to tell from the photos, but this is a full 2-layer, 8" cake (looks much smaller in the photos I think).  The couch is molded from cereal treats, then covered in fondant.   This was a fun cake to make, and also a pleasure to make for someone so nice!

I am very excited about my next cake project... It will be complete on Oct. 28, and I will hopefully have photos posted the following day...stay tuned!  In the meantime, here is the quilter cake from a few different angles.  Thanks for looking!


Saturday, October 22, 2011

White and Dark Chocolate Panel Bliss


I admit, I have been on a bit of a chocolate panel kick recently.   I just love them!  What a great way to enhance a delicious cake!  This time I wanted to do something without chocolate transfer designs.  I thought dark and white chocolate would make a nice contrast, and decided to cut random sized pieces of my panels on a slant and alternate them around the cake.  The panels were hand made by melting chocolate onto wax paper and cutting to shape once hardened.  My good friend (the birthday recipient)'s name begins with an "L", hence the hand-made white chocolate "L" atop the cake!    To view another panel cake design or chocolate transfer sheet cake - scroll down to the bottom of this page and select "older posts".


Thursday, October 20, 2011

3-tiered 30th Birthday Cake


I love how the colour combination worked out for this cake!  The "30" was approx. 4" high, and the cake weight 17 lbs.


Dogs Playing Poker


My Dad loves playing poker  I thought it would be fun to make a Poker Table cake.  Then decided to challenge myself even more and make it a DOGS Playing Poker cake!   This took countless hours and was the first time I sculpted figures, but it was a lot of fun and I was especially happy with how the dogs turned out!  The doberman is wearing an "I 'heart' New York" t-shirt.  The bulldog is cheating with an Ace of Spades hiding under the table, between his toes.

Poker table is the actual cake.  Chairs are made from rice krispie treats covered in fondant.  Poker chips, cards, mugs of beer, cigars,  dogs and floor are fondant.

Naughty bulldog cheating, with an Ace of Spades between his toes!

Dalmation eyeing his competition

Sweet, fluffy dog

 Slice of cake


Tuesday, October 18, 2011

Kayak Cake and Farmer with Chickens Cake


I had the honour of making two really fun cakes for two dear friend's husbands...However, it is tricky making an actual person out of fondant -  I worried that if I didn't have their features quite right they could be down-right offended.  I was thankfully given full-creative license on both cakes, and I think both Fondant Barry and Fondant Flav were a success!

First up is Fondant Barry Kayaking with his Faithful Blind Cat Stevie.    Followed by Fondant Flav and his Egg-laying Chickens!   Check them out...


Real Barry and Fondant Barry together at last!


 ...and along came the chicken farmer...


 Flav in the wooden barrel and chicken coop prior to cake assembly.

Real Flav with his barrel tub buddy

Sunday, October 16, 2011

SEMI-SWEET


A sweet read!  

For all of you who love to bake or have ever dreamed of opening your own cake/cupcake shop...I highly recommend this delicious and delightful fictional novel by the brilliant and charming Roisin Meaney.

This is an entertaining story with wonderful characters that takes place in a small town in Ireland;  Hannah, the main character, is about to open a cupcake shop when her boyfriend announces he's leaving her for another woman.  To find out more, you'll have to read it yourself!

"An endearing, insightful story of self-discovery, empowerment, love, and yes, most deliciously, cupcakes." - Erica Bauermeister, author of The School of Essential Ingredients.

Roisin is a friend, and a very talented best-selling author from Ireland whose books are now being introduced into Canada and the U.S.   Semi Sweet is available in bookstores in the U.S. and Canada, and online (Amazon.com).

After reading this book, I wanted to run out and open a cake shop on the spot!  :-)

Halloween Cake Pops


Halloween Cake Pops - 2010

Thank you, Bakerella, for super fun treat ideas that made me the hero at my kids' school!  I was up until midnight last Halloween making approx. 60 cake pops for my two older children's classes...only to find out the next morning that my son's class wasn't having a party like the rest of the school...Argh!  I brought them into his class anyway, with large dark circles under my tired eyes, smiling politely at his teacher,  explaining the effort they took. Thankfully, my son's teacher was happy to receive them, and being the ONLY treat brought in for his classmates (in a school FULL of treats in every other class) made me a celebrity for the day. ;-)

Lego Cake


Lego is a very popular theme cake to make.  I had no appreciation for how well-received this would be by kids.  If I had to put money on which lego cake would be most popular with kids, it would have been the Star Wars one.  Turns out my wallet would have been a little lighter!  


Lego logo made with fondant


Little lego guys were made using a lego ice cube tray.  I molded fondant into the trays, and put them in the freezer for a few minutes to harden.  Once ready, I popped the little guys out and hand painted (with food colouring) pants, hands, and faces on them.


Lego bricks are chocolate, just like the Star Wars Lego cake.   I cut 3 chocolate lego bricks to form an "11" at the front of the cake, as this cake was for a boy turning 11.


Little lego guys in various stages of decorating.

Saturday, October 15, 2011

Death Star Lego Cake with Fondant Star Wars Figures


A long time ago, in a kitchen far, far away...

...a Star Wars Lego cake was created for a wonderful boy!  This was my first commissioned cake.  I had to think long and hard as to what an 11 year old boy might like Star Wars-wise.  I wanted to make sure whatever I came up with was "cool" and not "babyish"  I think it turned out well, and from what his mom tells me, it was a success!  It was such fun to make!  

The figures are hand-sculpted to (hopefully) look like Lego Star Wars guys.  The lego bricks are solid chocolate.  I found lego brick ice cube trays online (eBay I think?), poured melted chocolate into them and these were the result!  

The death star is a chocolate cake. The bottom (blue) cake is chocolate as well.  


 Look at these cute little guys!


Friday, October 14, 2011

Panels and Buttercream and Chocolate - Oh My!


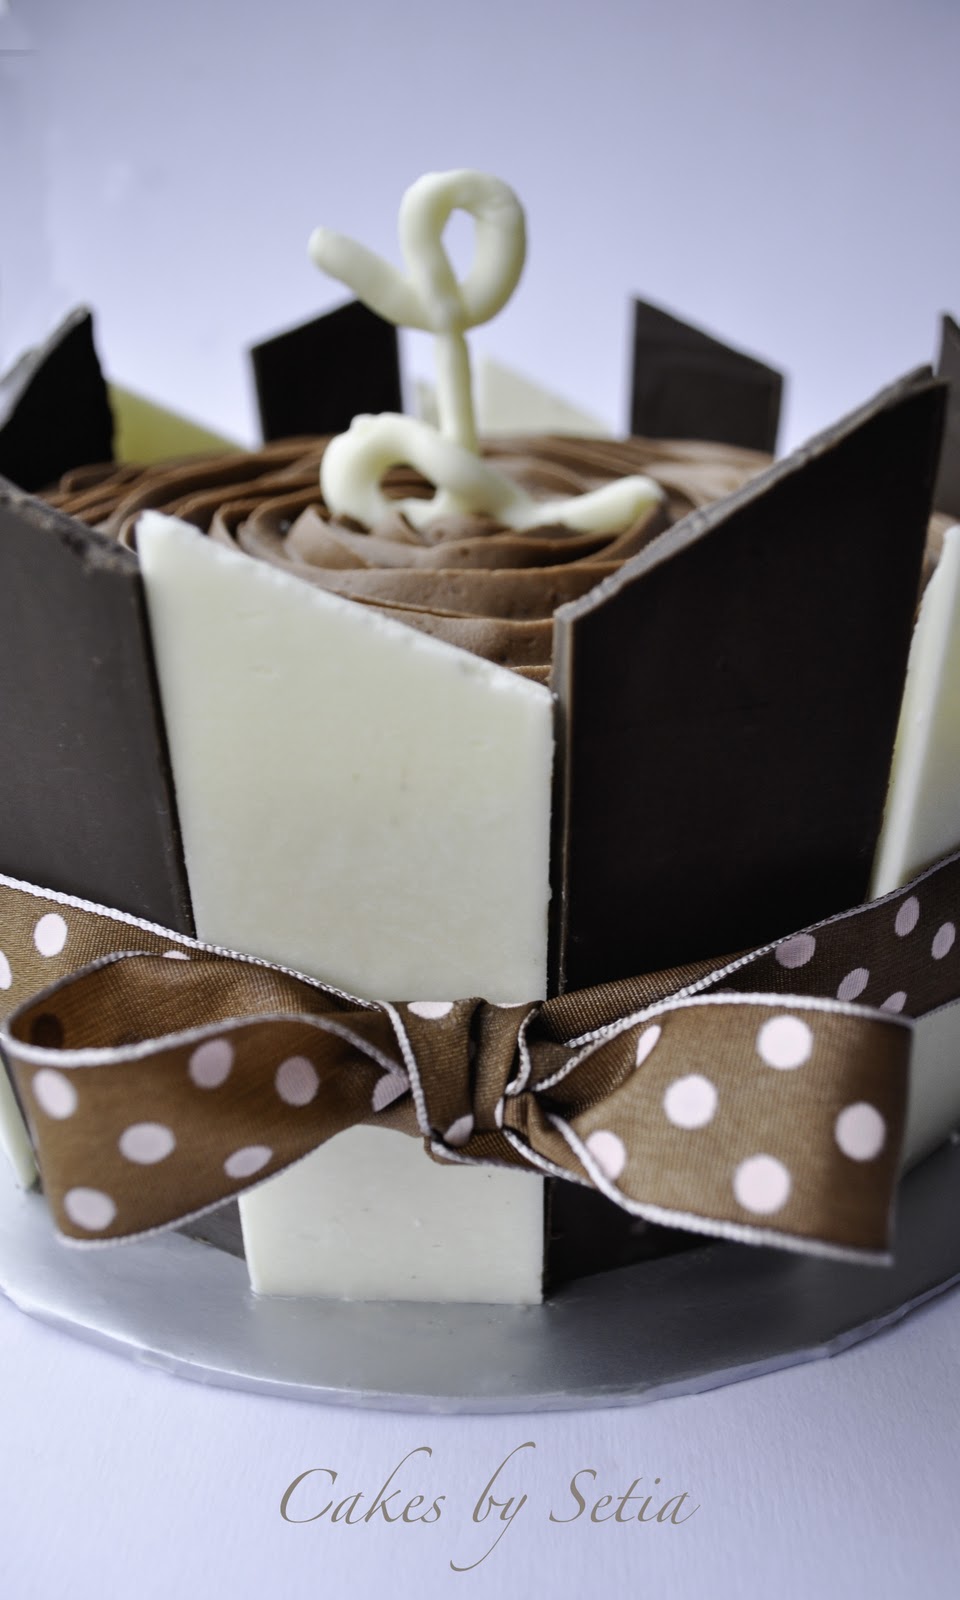
 Chocolate cake wrapped lovingly in dark chocolate

I love this cake!  It was made for my sister's birthday.  I'm also really loving chocolate transfer sheets!   When making non-fondant type cakes they are great for adding that little extra 'something' to your decadent creation!

My sister kindly took some photos of various stages of the chocolate process as I was making it.  (nothing like putting the cake recipient to work!!!).  The lighting in my kitchen is terrible (much to my sister's frustration), so please excuse the poor  lighting in these photos...!

I decorated an 8" round cake and covered it with chocolate ganache. And then the fun began...!


How to make this cake:

Determine the height and circumference of the cake
 I measured my ganached cake to see how high it was, and then added a little extra height so that it came slightly above the top of the cake.  Easiest way to measure the circumference is to take the transfer sheet and wrap it around the cake pan used to bake the cake...(On those nights when I'm tired and up late decorating, mathematics is not my thing...!!)  Add a little extra length so you don't end up falling short.

Lay a piece of parchment paper (or wax paper) down on your work surface. 
 Lay the transfer sheet on top of the paper, textured side up.  Adhere the transfer sheet to the paper with some melted chocolate or icing.  You don't want your transfer sheet sliding around while you spread the chocolate, so put tiny bits of icing/chocolate every 4" or so along the parchment and on each corner of the parchment.


Important note:
Mark the corners of your transfer sheet on the parchment/wax paper with a pen.  Because your chocolate will spill over the transfer sheet area, you will need to know where to make your cuts and the transfer sheet will be hidden below the yummy melted chocolate.  

Melt chocolate 
(30 second increments in the microwave, stirring between each)


Pour melted chocolate onto transfer sheet and spread evenly.  
You'll want it reasonably thick when wrapping around the cake so that it isn't too brittle.


Wait for chocolate to harden slightly.
When making chocolate panels, you will let the chocolate fully harden (you can speed this up by putting it in the fridge for a few minutes).  However, when doing a wrap, you will keep your chocolate on your work surface and keep a watch on it until it is firm enough to cut/trim, but still soft enough to wrap around your cake without breaking.  It only took approx. 7 mins on my counter, so be sure to watch it closely.

My apologies here...with 2 screaming toddlers we dropped the ball on photos for this part!!

Trim excess chocolate and get ready to wrap!
 (this is where the marked parchment is important to guide you).  
Gently pull up one end of your transfer sheet, carefully removing it off the parchment paper.  Hold length of transfer sheet in both hands.

Wrap
Place one end of the transfer sheet against the side of your cake, pressing the chocolate to be wrapped against the ganached cake.  Wrap your cake by slowly turning it and pressing the chocolate against the ganache as it turns.  Be sure to check that the bottom of your transfer sheet is even with the bottom of your cake.  You will likely need to trim the extra chocolate/transfer sheet to make your two ends line up.  Once wrapped, tape the outside of the transfer sheets where the ends meet.  This will keep your wrap in place until the chocolate has fully hardened.

Put in fridge for a good 20-30 minutes so that chocolate is fully hardened.


Remove transfer sheet.
Remove cake from fridge.  Take tape off, and gently begin to peel one end of the transfer sheet away from the chocolate.  Turn cake slowly as you peel, until all of transfer sheet is removed.  You should now have a beautiful design on the outside of your chocolate!


Decorate your cake!!

For this case, I used vanilla buttercream swirls and added leftover bits of chocolate that I cut in triangular shapes from the transfer sheet.


Voila!